-
Recent Posts
Archives
Categories
Meta
C05M 11,000KV 1.0 mm Shaft: Discontinued.

C05M motor (Used in the mCP X Brushless Conversion) will no longer be available on our website. It will be replaced with our new motors, which are coming soon.
Thank You for Your Support!
Posted in Blade mCP X, Shopping
6 Comments
mCP X Brushless Mod 1.5mm 9T Pinions NOW AVAILABLE!
9T 1.5mm Brass pinions (2-pack) now available. Fits C05M brushless motor w/1.5mm shaft used for mCP X brushless conversion. Free shipping via USPS.

Until supplies last: BUY 5 PINIONS for only $14.50 with FREE SHIPPING! Click on the Button Below:
Posted in Blade mCP X, Shopping
28 Comments
Blade mCP X Gone Brushless
Went brushless today with my E-Flite Blade mCP X. This post will show you how to do the same.
Key Ingredients:
- Brushless motor:AEO C05M Brushless Motor-11000kv
-4.2 grams
-14mm diameter
-1.5mm shaft
-Max power: 60 watts
-No Load current/voltage: 0.7A, 4.2V
- Brushless Speed Controller: XP-7A-Can find this on eBay for about $10, or from wowhobbies: http://www.wowhobbies.com/sale1299xp-7aebayblesc.aspx
-weight: 1.4grams w/out wires.
- The Steve Converter-Converts PWM signal from flybarless 3-in-1 controller to a servo 1-2ms signal that the speed controller can understand.
-Available here for $15: http://thesteve.ca/walkera/
-Weight: 0.43 grams
- Pinion: GWS 9-tooth 1.5mm diameter pinion from BP Hobbies-Available here
-Cost: $0.10
-Weight: 0.11g

Step 1, Remove unnecessary material from the frame to make room for the wide brushless motor. Motor is less than half the original motors height, but it is wider.


Step 2, Install pinion on motor using a vise. In order to get the pinion on far enough, I drilled a .070″ hole in a piece of wood to allow room for the shaft while pressing the pinion on. Be careful, these motors are delicate.

Step 3 (Optional), install 3-in-1 PCB and see how components will be layed out. Note: In this picture I have already soldered my “The Steve” converter onto my ESC, but we’ll cover that soon.

Step 4, Measure and cut motor wires. I used a length of 3cm, as shown. I removed about 1.5cm of motor wire to get to this length. Brushless motor wires are different then normal wire in that each strand is enamel coated to provide insulation. This is only the case with motor wires that are the same wires as used on the stator of the motor, which seems to be quite common in our hobby. As such, make sure that after you strip the wires, you tin them with solder. It will take a second or two for the wires to get tinned because you actually have to burn away the existing insulation, but it’s not as big of a deal as some people make it out to be. I shaved off 0.45g, or roughly 10% of the motor+wire weight.

Step 5, Remove the motor wires from the ESC as they weigh 0.80g (for all three) and are unnecessary. You can solder the motor wires directly to the ESC, saving the weight of a connector and a lot of wires!
If you lack proper soldering skills, there are some helpful tutorials at SparkFun: http://www.sparkfun.com/tutorials/213
I recommend having a more experienced person nearby to help you if you are new to soldering, as they will quickly be able to show you the proper techniques.

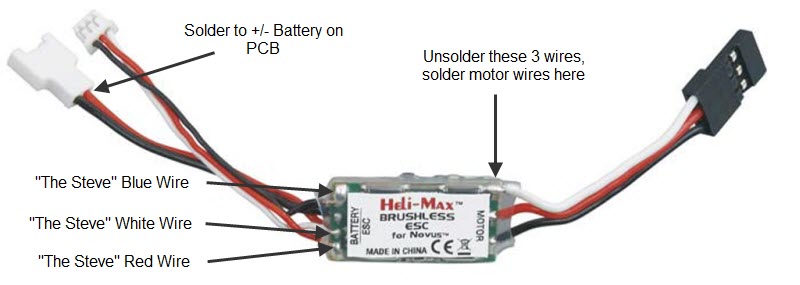
Step 6, Unsolder the receiver connector from the ESC (which weighs 1.04g!, twice as much as the entire “The Steve” converter) and directly solder the blue, red, and white wires to the ESC, as shown in the above picture. As you’ll see in next picture, I directly tuck “The Steve” into the heatshrink wrap for my ESC. I didn’t need to trim any wires on “The Steve”, but you might want to shorten them just a hair.

Step 7, Heatshrink wrap the ESC. I don’t know what size heatshrink wrap I used, as I just had it laying around. I tucked my “The Steve” converter directly into the heatshrink wrap, leaving the yellow wire hanging out.


Step 8, Cut to length and solder the red/black wires on the ESC to the white/black wire stubs on the PCB. This is the +V and GND rails which are directly connected to your battery. Install doubled sided sticky tape on the bottom of the ESC paste onto the 3-in-1 as shown. Nice and clean :).

Step 9, Using a fine-pitch soldering iron tip, solder the yellow wire of “The Steve” to the PCB as shown. This is the microcontroller side of the gate net of the DC motor transistor. If you don’t know what that means don’t worry about it.

Step 10, Install PCB and admire. Notice how I don’t have anything else on my bird? This is because I bought a new frame and transferred everything onto it after doing the brushless conversion. You will need to install the servos, head, main gear, tail boom, and canopy.

My bird came out at 42.76grams, and stock it weighed 45.67g (both including 1 e-flite battery), so almost 3 grams less for brushless! Sweet dude. The stock brushed DC motor weighs 9.78 grams alone, so this is a huge improvement. Usually I don’t care too much about extra wiring, but in the case of the mCP X, it totally makes a difference in weight.
Headspeed:
I used my cellphone to measure headspeed. I have my throttle endpoints set at +/- 100%, and then I adjusted my throttle curve and measured the following rpms:
50% throttle – ~4000rpm
65% throttle – ~4300rpm
75% throttle – ~4500rpm
Flight Times at 75% throttle:
200mah e-flite battery: 4mins w/ending voltage of 3.65-3.7
240mah eBay 20c battery: 4.5mins w/ending voltage of 3.70-3.74
300mah Turnigy nano-tech battery: 5.5mins w/ending voltage of 3.70-3.72
First Impressions:
This thing hauls ass! It does not bog down at all. I have my throttle set to 75%. The tail holds really really really well. That was surprising to me, considering I am using a stock tail motor and only a +0.5cm extended tail boom. Flight videos coming soon.
The meshing between my pinion and main gear was initially kind of tight, but everything settled in and the meshing is now very good, not unlike a stock mCP X. It’s not really adjustable (I tried), but if it’s too tight it seems to kind of wear in (unlike bigger helicopters).
I have been able to do continuous flips for entire flights w/out much issue. One noticeable difference is that the tail holds really well for the entire flight. This makes a HUGE improvement on the fly-ability. Also, I can flip this thing in a *much* tighter flip, very similar to my T-Rex 500 and 450 heli’s. Not only is this thing as stable as the bigger heli’s, but it maintains the headspeed like bigger heli’s and holds the tail perfectly like bigger heli’s.
Matt
Posted in Blade mCP X
86 Comments